

samsung ကေနမၾကာေသးခင္ကအသစ္ထြက္
ရွိလာတဲံ့tablet 8.0 ကုိ CWM သြင္းျပီး root ..
ေဖါက္နည္းေလးေတြ႔လာလုိ႔မူရင္းအတုိင္းဘဲတင္
ေပးလုိက္ပါတယ္..လုပ္နည္းေတြကလည္းအရင္
ဟာေတြနဲ႔တူတူပါဘဲ.english လုိေရးထားတာက
လြဲရင္ေပါ့ဗ်ာ.....
tab 8.0 ရဲ႕model သုံးခုကုိ cwm /root ေဖါက္ပုံေတြကအားလုံးတူတူပါဘဲ....အထူးသတိေပးခ်င္တာ
ကေတာ့မိမိရဲ႕model နဲ႔ကုိက္ညီမဲ့ cwm ကုိေရြးရမွာအဓိကပါဘဲဘာသာျပန္ရမွာပ်င္းလုိ႔နားလည္ပါေနာ္
- Galaxy Note 8.0 GT-N5100 (3G+WiFi)
- Galaxy Note 8.0 GT-N5110 (WiFi)
- Galaxy Note 8.0 GT-N5120 (LTE)
If you are in a fix as to whether or not you should root your Note 8.0
or not, do not forget to read the following article that might help you
decide the right path:
Disclaimer:
Please note that the procedure given
below has been tested successfully but it is considered risky and if it
is not performed carefully might soft brick your Galaxy Note 8.0. Think
twice before crossing this line. Remember, you have been warned! The
developers of CF-Root, CWM packages or we at DroidViews must not be held
responsible for any mishap.
Preparations to be Made:
So if you have made up you mind to go
with rooting, here are a few tools that you need to gather together and
preparations that must be complied with before proceeding.
- Download Odin3 1.85 for installing the CF-Root package: Odin3_v1.85.zip
- Download Odin3 tool for installing the CWM packages: Odin3-v3.07.zip
- Download CF-Auto Root depending on your device model. You can check the model of your Note 8.0 from Settings> About.
- Download the appropriate ClockworkMod recovery file for your device model:
- Download and install either Samsung USB Drivers or Kies on your PC. If you already have any of them, skip this step: Download Here
- Turn on USB Debugging on your device from Settings> Developer Options.
- Next, charge your Galaxy Note 8.0 to ensure more than 60% battery life.
Rooting Galaxy Note 8.0 Using Odin:
- Unzip the CF-Auto-Root zip package. Inside the extracted folder, you’ll see a file with .tar.md5 extension which will look like this: CF-Auto-Root-kona3g-kona3gxx-gtn5100.tar.md5
- Also unzip the zips with Odin3 1.85 to your desktop.
- Turn off your Galaxy Note 8.0 and boot it into Download Mode: press and hold the Volume Up + Power buttons at the same time for 2-3 seconds till you see a warning screen with a yellow triangle, asking you to press Volume Up button. Press it to enter Download mode.
- Now launch Odin and connect the device to PC using USB cable. Wait till the ID:COM port at Odin turns Yellow.
- Do not touch anything on Odin and directly click the PDA button and select the file with .tar.md5 extension. In my case, I have selected CF-Auto-Root-kona3g-kona3gxx-gtn5100.tar.md5
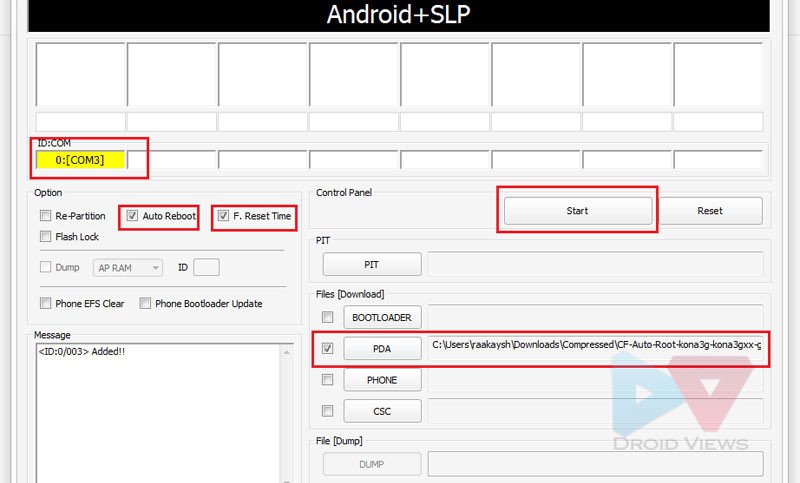
- Then click the Start button and wait till the rooting package is installed on your Galaxy Note 8.0. It’ll take just a few seconds.
- When the installation finishes, you will see PASS! message on Odin and your device will reboot automatically. It will take a while to boot up normally.

Installing CWM Recovery on Galaxy Note 8.0:
If you also wish to install the ClockworkMod Recovery on your device, you can install it via Odin using the same steps as given above. Just do the following steps:- Put the device in Download Mode again.
- Launch Odin3 3.07 and connect device to the computer.
- Click on PDA button and select the CWM recovery file with .tar extension you downloaded above.
- Finally, click the Start button.
- When you see the PASS! message and device reboots, disconnect the cable.
ဗိုလ္လိွဳင္း (ဆိပ္ျဖဴသားေလး) လြင္ဦးေမာင္ (ေျမာင္းျမသားေလး)


